Showing posts with label food. Show all posts

1.12.2012

Flatten your...cake layers?

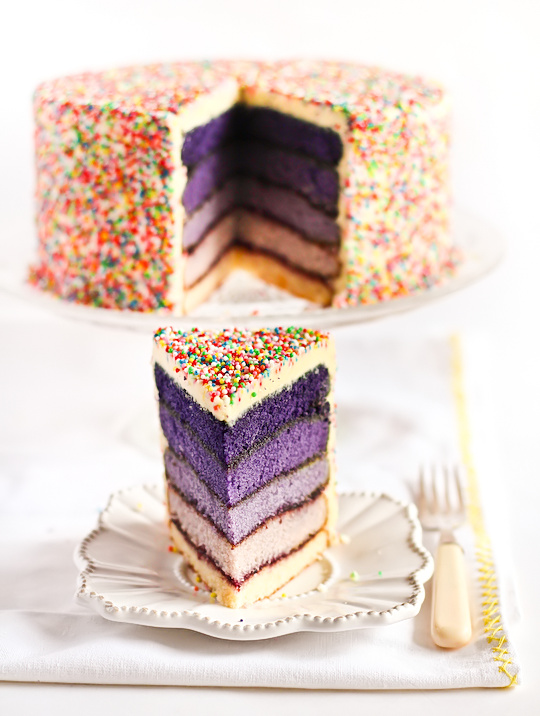
Sprinkle cake, a la Raspberri Cupcakes

This is usually the time of year when folks start thinking about losing weight, eating better, and generally being more healthy in the new year than they were in the last. While the rest of the world is daydreaming about finally getting those abs flat, I'm hung up on trying to get my cake layers flat. I mean, layered cakes are a big enough hassle without having to wrestle 1/4-inch off the top of each cake with an abnormally long serrated knife, amiright? I mean, someone could lose a finger, and that would not be a great way to start the new year. (As a side note, if you are looking to cut calories, check out this post for a tasty way to prepare boxed cake mix in a calorie-friendly way!)

I made a sprinkle cake on Saturday. The Dr. had been craving wedding cake for a week, and we were hosting our preacher and his wife for dessert so I figured, why not? I would've loved to do an ombre cake like Steph's, but the Dr. can be picky about details and I didn't think purple wedding cake would go over well. Word to the wise, though: covering a cake with sprinkles is WAY HARDER THAN IT LOOKS. I think I'll be finding sprinkles in the nooks and crannies of my kitchen until the day we move. I have absolutely no suggestions on how to prevent them from going everywhere, either; Steph suggests putting your cake into a giant container of some sort, but I was frosting on a cake pedestal so that was a no-go for me. I can only say if you're going to try this at home, have the vacuum handy.

Anyway, on with the point. I figured out an easy, no-muss, no-fuss, no-cutting, no-waste way of getting those cake layers perfectly flat, every time. And here's how I did it:

Step 1: Remove the springform section of the pan from your cake as soon as it comes out of the oven (leave the cake on the round metal bit underneath); place it on a wire rack to cool.

Step 2: Cover warm cake with a flexible silicon cutting mat.

Step 3: Put a large, flat cookie pan on top of the cutting mat.

Step 4: Plop a 2-pound bag of sugar (or other light weight) on top of the whole stack.

Step 5: When cool, remove all items from the top of the cake. Note that the just the very moist top coat of cake is going to stick to your silicon mat; this is your delicious, taste-testing treat! Scrape that goodness off with a fork and eat it. (Hey, you gotta make sure your cake is guest-worthy without cutting into it somehow, right?)

Voila! Perfectly flat cake layers with no cutting, no fuss, and no waste.


I didn't add any additional steps to this process - promise! No cutting, no weird frosting-some-parts-more-than-others, nada. Just stacked 'em right up and slapped some frosting on! And look how pretty and even it came out!

I think this technique could also work with sheet cakes; instead of a silicon mat, you'd want to use parchment paper, and instead of a cookie sheet and weight, use a light book or two.

....Yeah, I'm totally doing this any time I make cake layers from now on. WIN.

8.24.2011

Deliciousness: Banana Oatmeal Chocolate Chip Cookies

First I just have to say that you really must try these cookies. The first time I had one of these was at my friend Lisbeth's house, and when she told me she was going to make "Banana Cookies", I was a little reticent. Then she told me they also had oatmeal and chocolate chips, and I felt a little better about it. The defining moment, though, was when she gave me a little round of frozen cookie dough to eat. Let me tell you - not only did I take back my snarky comment about banana cookies being "gross" (or something similarly gracious), I also wound up groveling for the recipe. Lisbeth, being the amazing friend she is, generously complied. You can find the original recipe here.


Raw, frozen cookie dough & warm, gooey cookies

The Dr. practically expects me to have a stock of these in the freezer at all times. In fact, we both like the frozen, raw dough so much I almost never even get around to baking any, but they are quite delicious both ways.

You can make up a batch of these in practically no time at all, with stuff you probably already have lying around your pantry. I almost always make a double batch, and am able to use my hand mixer to mix up all of the ingredients except for the chocolate chips. Once your dough is mixed, use a small cookie scoop (like this) to portion the cookies out into a large, airtight plastic container. You can get about 3-4 dozen cookies into one of Ziploc's large rectangular containers; be sure to put a piece of wax paper between the layers, so the dough doesn't all stick together.

If you're baking the frozen dough, heat your oven to 375 degrees and bake for 8-10 minutes. Basically, you want to leave them in just long enough for the cookies to set, or you'll wind up with crunchy cookies. Still tasty, particularly if you happen to like crunchy cookies, but I prefer these with a nice, chewy texture and just-barely-crispy edges.

8.21.2011

Deliciousness: Pretzel Bites

Cooking always gives me a little pick-me-up when I'm feeling sad or bored, or need to feel like I've accomplished something. With the Dr. at Vascular Fellows Bootcamp in Houston all weekend, I needed something to do. So, I whipped up a batch of pretzel bites and invited the neighbors over for some board games!

Cinnamon Sugar Pretzel Bites & Vanilla Glaze

I followed Jonna's recipe from Get Off Your Butt and Bake! You can find it here. The genius of this recipe lies in the fact that you get to use purchased, frozen dinner rolls as the base for your pretzels! Jonna recommends Rhodes Texas-sized rolls, so that's what I bought. The recipe says you have to thaw them out, so genius me, I decided to toss the whole bag of rolls in the refrigerator to thaw out overnight. I, um, exploded the bag (these are yeast rolls). Oops. Actually it wasn't too bad, the bag had popped a seam and a big chunk of dough had oozed out. I just cut that part off and continued with the recipe as written, except that I had one ginormous piece of dough to work from instead of individual rolls. Ah, well.

Garlic Parmesan Pretzel Bites

I followed the recipe for the cinnamon sugar bites exactly as outlined in the original recipe, except that I didn't need to let the balls of dough rise before boiling, and I forgot to grease the baking sheet. Don't forget to do this. For the parmesan version, I added a generous shaking of garlic salt to the parmesan before I rolled the bites, and they were DELICIOUS.

I'll definitely be making these again! They're quick, easy and inexpensive, plus you can make a huge platter full of pretzel bites out of just one bag of rolls, so they'd be great for parties.

Oh, and the board game we played?

Mid-Life Crisis, ca 1982. What can I say? I go for the obscure.

8.19.2011

Deliciousness: Andes Mint Cupcakes

Are you guys on Pinterest? I am, and I find it extremely inspiring; having all those photos of fashion, stylish hairdos, DIY tutorials, enchanting destinations and especially food scroll through my screen is fascinating to me. I've been trying loads of new recipes (you can follow that board of mine here) and thought I might start sharing a few of them with you. Up first is something I just whipped up for the first time today, Andes Mint Cupcakes, from Your Cup of Cake. Lizzy's recipe just sounded so good I had to try it! I'm a sucker for Andes Mints. Anyway, here's my version:

I actually broke out the piping bags!

One thing you can't see from my photo is that these cupcakes are filled with Chocolate Mint goodness. Lizzy suggests using a squeezy bottle to pipe the chocolate inside, but I didn't have one on hand so I just used a small, round pastry tip and a piping bag. I must say, I think a squeezy bottle would be easier, but I got the job done! 

Putting one of these in your mouth is simply magical; you get tangy, fluffy, chocolatey cake, oozing with peppermint chocolate sauce, and creamy, perfect peppermint buttercream. Need I say more? I had to force myself to stop at just one; I'm taking the rest of these around to my local yarn shops this weekend! (Don't you wish you lived near me?)

I made these cupcakes exactly by the recipe; the ONLY thing I changed was that I only put half an Andes on top of my cupcakes, instead of a whole one. From one recipe I was able to make two dozen regular sized cupcakes, and 3 Texas-sized cupcakes. I filled the cupcake liners with two scoops from my small cookie scoop (similar) and they turned out perfectly fluffy! At first I wasn't sure the chocolate filling would get me through all 2 dozen cupcakes, but it did and I was even able to drizzle some over the tops of the cupcakes as in the original blog post. It took me just over an hour from the time I started mixing up the cupcake batter to the time I was finished decorating.


I'll definitely be making these again; in fact, I'll probably be using the cupcake part of the recipe any time I need to make chocolate cupcakes, because the addition of sour cream and buttermilk to the boxed Devil's Food cake mix is a stroke of genius. This was my first time ever filling a cupcake, and now I want to fill all the cupcakes!


Next time: Cream Cheese Filled Snickerdoodles! That's right, I said it. Stay tuned!

7.14.2010

No-Bake Blackberry Nectarine Cheesecake

Last night, we had guests for dinner and board games. Nothing too fancy, you know, just throw a couple of frozen pizzas in the oven (actually, we had these guys' frozen pizza, so as it turns out it was kind of fancy). The day before, I was texting the guests about dessert options, and given the choice between blackberry cobbler, cheesecake, or cookies, the answer was "Yes". Well! I got to thinking, and I started thinking that blackberry cheesecake sounded rather good, and to put it on a cookie crust sounded even better. So I mishmashed a few things together, and here's what I wound up with:

 Using nectarines instead of peaches prevents oxygen discoloration

I promised my Twitter followers a recipe, so here it is:

Crust
15 Pecan Sandies cookies, crushed to oblivion
2 Tbsp butter, room temperature
1/2 cup pecan pieces

Combine the crushed cookies and butter with a pastry cutter or your fingers. Press firmly and evenly into the bottom and sides of a 9-inch pie pan. Sprinkle pecans across the bottom, patting them into the crust a bit so they stick. Bake in a 350-degree oven for 8-10 minutes. Allow the crust to cool completely before adding filling.

Filling
2 8-oz packages cream cheese, room temperature
1 14-oz can sweetened condensed milk
1 Tbsp lemon juice + enough nectarine juice to make 1/4 cup
1 teaspoon pure vanilla extract
1/2 pint frozen blackberries, chopped into pieces

Note about the nectarine juice: Peel a ripe nectarine, then just sort of squish it to death with your fingers - you'll get lots of juice and a bit of pulpy stuff, too. The puply stuff is okay, because it'll all get blended in when you mix up the filling. :)

To make the filling, just dump all of that stuff except the blackberries into one large bowl. Mix it with an electric mixer on high until alllllllll the lumpy-bumpies are gone, or at least 5 minutes. Gently fold in the blackberries. Pour the filling into the cooled pie crust, and top with a sliced nectarine and a couple of whole blackberries. This cheesecake needs to be refrigerated at least 6 hours before serving, but it's best to make it the afternoon before and let it refrigerate overnight so it can really set up.

Enjoy!